Showing posts with label projects. Show all posts

Monday, April 8, 2013

of tire chairs and secret forts...

Who knew that old tires could have a purpose besides covering the plastic on the bunker silos?
 When I saw tire chairs on pinterest...
I knew they would be just the right thing for seating in a new fort over at the farm.
The fort is a work in progress...
and coming along quite nicely.


We retrieved a few tires from the stock pile. 
Hubby closed the bottom opening with a piece of plywood. 
I stuffed the inside with old pillows and covered the top opening with a piece of bear fur (not to worry...
it was faux fur). 

Then we called up the girls...
and said we were delivering chairs for their fort.


They declared the seating to be most suitable...
and immediately discarded the broken chairs they had dragged in.

I was not allowed to take any photos of the 'path leading to the fort'...
since it is all very secret.
Grandpa has been helping them build it.
He even wired it...
so they now have lights...
and music.
Don't you love their radio...
complete with 8-track player?
It belonged to their great-grandmother many decades ago.

I laughed when I saw the 'fort rules' posted at the entrance.
They salvaged a sign that a building contractor had once left at the farm.

And that is your sneak-peek into the secret fort at the farm...
and the two girls who are sitting pretty inside!
I won't likely be taking you back there anytime soon.
I think what happens there...
stays there. 


Thursday, March 7, 2013

cars and trucks and things that go...

He loves 'cars and trucks and things that go'.
Like tractors!

And when he is here...
we play with hotwheels and matchbox cars that were once his daddy's.

I had planned to make him a little car caddy for his birthday in fall...
His birthday came and went...
and the fabric lay waiting in the drawer.


Micah came to visit this week...
and while he played with cars...
I sewed up the caddy.

I followed the tutorial for the most part...
but used printed cotton rather than denim fabric.
Since the fabric was lighter in weight...
I backed it with a lightweight quilt batting.


The pockets along one side hold six cars...
 

...and the caddy folds up into a small pouch which is secured with a velcro band.  
He left happy!

One of his favorite books happens to be...
'Cars and Trucks and Things that Go' by Richard Scarry.
Funny...it used to be his dad's book of choice as well.
I think the appeal of the book is more about finding the elusive goldbug...
than about the cars and trucks, however!

Whether you are on the road or at home...
have a great weekend.


Thursday, January 31, 2013

you can DIY!

Or a friend can do it for you! 


 I have a new favorite coffee mug...
that came from a very good friend.

It's big...and holds lots of coffee!

And she made it especially for me.
Well, she never actually made the mug...
but she personalized it with a nice message.

It takes a long time to grow an old friend! 
(I'm OK with being called 'old'.)

I had been planning on trying my hand at writing on dishes...
after seeing all the neat examples on pinterest.

Simple...
so they say.
Buy white plates or mugs.
Write your message with a black 'sharpie' pen.
Bake for 30 minutes at 350°F...
and your message is permanent.
A great gift idea...
I thought.
I thought so even more when I was the recipient of such a gift.

She reversed the method.
She bought a black mug...
and wrote with a white marker.
And she suggested it might be easier to write on a plate than on a mug.
Well, I think she did a great job.
She has beautiful handwriting!
Thanks, Janet.

I'll leave with you few more simple ideas that you can 'do yourself'.
We had a group of friends over for dinner one night this week...
and celebrated a milestone birthday for one of the guys.
The place cards were wee photos of all the guests...


...attached with a paper clip to a cork and 
tucked into a candle holder of any size or height.
I think my grands would like this idea as well!

And one more simple idea...

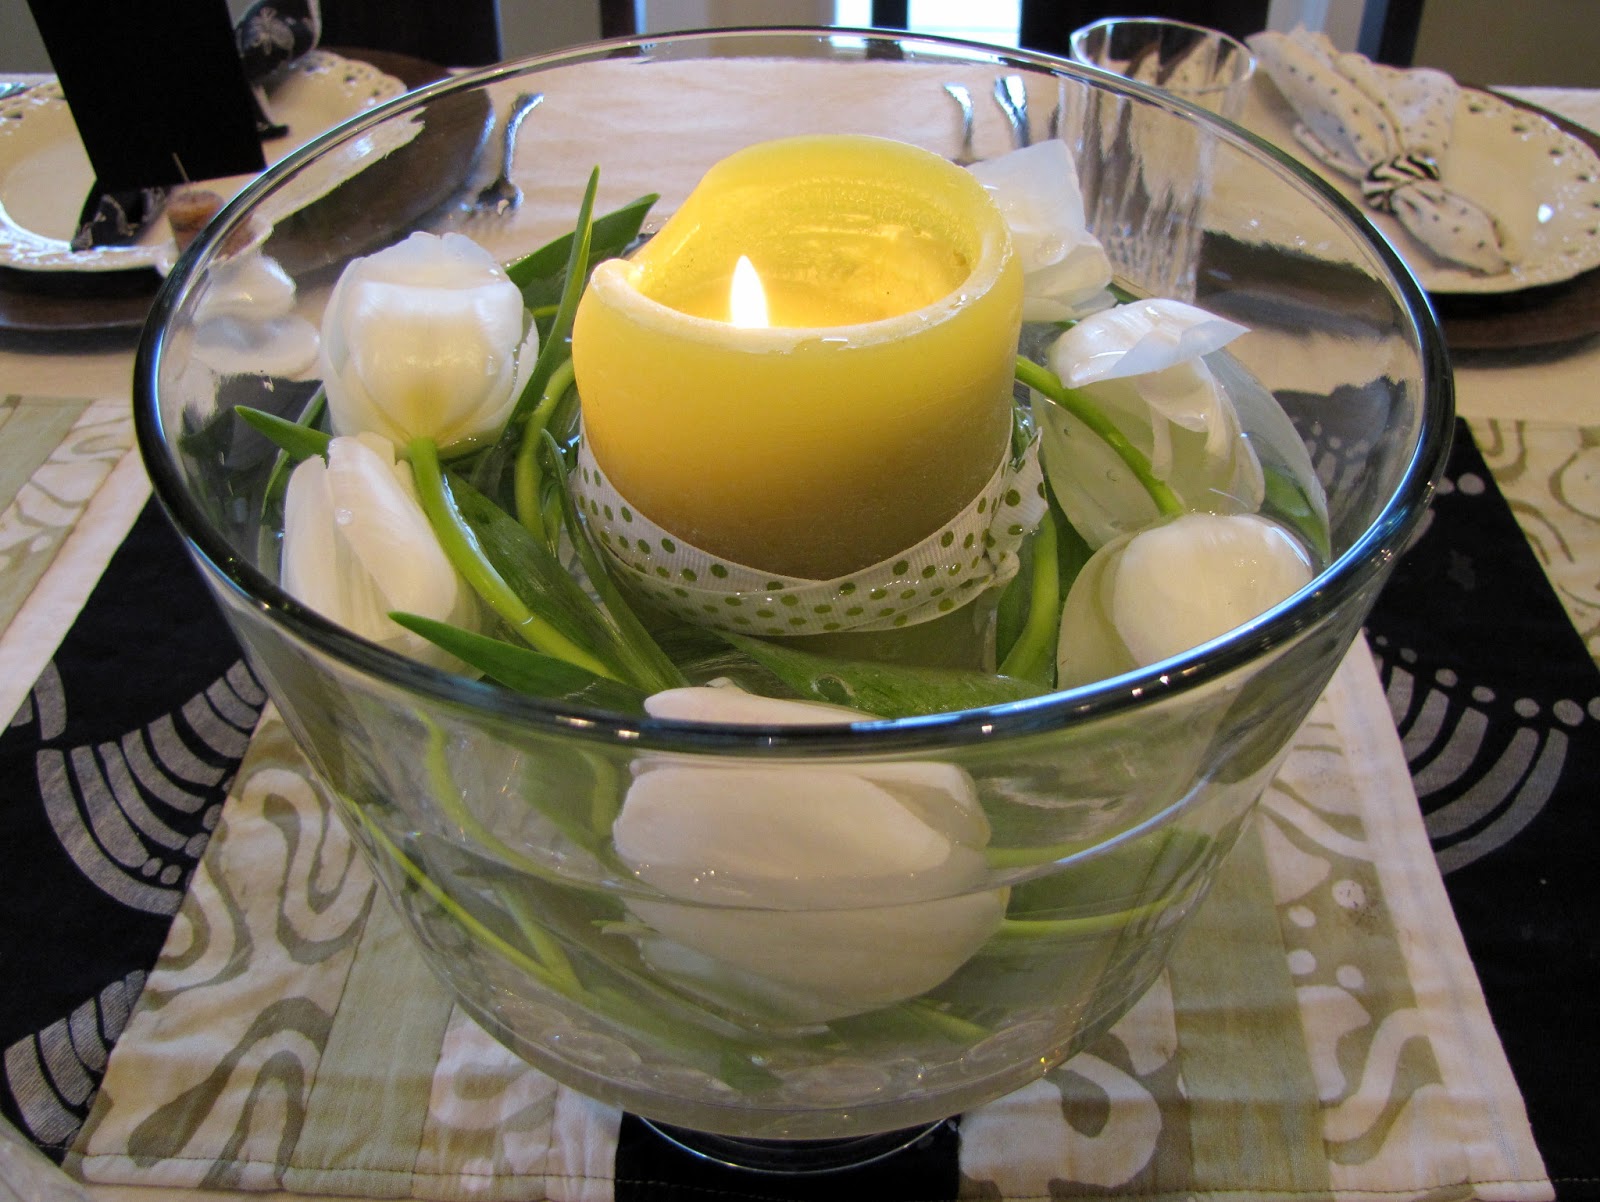
...a 'fishbowl-vase' submerged floral arrangement. 
 I used a trifle bowl...
set a candle in the center...
twirled a few tulips complete with their stems around the candle...
and poured in the water.
Roses, orchids or tulips all love being under water...
and make great submerged arrangements.
And those are my DIY tips for this Friday.
Have a great weekend!
 

Friday, January 4, 2013

handmade and pinteresting...

Though I am little reluctant to 'pack away Christmas'...
I started yesterday.
In a small way.
Indoors only.

And I took note of a few of gifts...
handmade ones...
that I am not packing away...
but will enjoy throughout the year.


Those white-washed milk bottles that sit on my wee kitchen window sill...
were a gift from Lisa.
She got the idea from pinterest...
and went with it.
So fun.
I love them!


And my sister sent me a personalized calendar.
If you happen to be related to me...
all your important dates are marked on the calendar.
It is hanging in my ensuite...
where I am bound to take note.


A soft and fleecy scarf arrived in the mail at Christmas...
handmade by a dear friend from afar.
A scarf with pockets.
How fun is that?

Way back when...
I got inspired by Vee to make boot cuffs for my girls.
And then Karen was turning out infinity scarves by the dozen...
so I thought I'd try my hand at those as well.
 

On our road trip in November I crocheted three sets of infinity scarves...
and three sets of boot cuffs.
I couldn't tell you about them at the time though...


...since they were Christmas gifts for these three girls.
 The cuffs fit. 
They look better with boots, though! :)


I sewed all the grandgirlies some nice girlie aprons...
and found a reindeer apron for Ryder...
but Micah was apronless.
So...
just before Christmas...
I quickly sewed him a gingerbread man apron...
with stuff from the scrap bag.
I saw a picture on pinterest...
copied what I saw...
and it turned out cute.
So...
I'm sharing it here now...
in case anyone needs ideas for next Christmas.
By then I will have long forgotten about it.

I packed away my nativity scene yesterday...
along with the handmade Saint Thomas Cross that was part of the display.


The wooden self-standing cross is made by carving pale wood (such as aspen) into paper thin shavings.  
It is a traditional Finnish Christmas decoration and came from our friends in Finland.  
There are not many craftsmen left who are able to make the crosses...
and so I treasure mine. 

And that is  my 'handmade and pinteresting' post for today.
 
Enjoy the first weekend of 2013!
 

Thursday, July 26, 2012

a few pinteresting ideas to share...

If you need a little inspiration...
head over to pinterest and browse a little.

I've browsed...
been inspired...
and pinned.

 And one day when I have time...
there are many fun things waiting for me to make.

Many months ago I decided I would try the 'sundress-made-from-a-dress shirt' idea...
that I found on pinterest right here. 
I cut the pieces...
and waited for a rainy day to sew it up.

We had plenty of those...
and still the project lay unfinished.
With July coming to a close...
and sunshine in the forecast...
I finally sewed up the sundress.


Cute...I said to myself.
I then I called Maggie to come try it on.

 Even cuter!
I put on the finishing touches and she took it home.

So...
if you have an old dress shirt or two that  need re-purposing...
and a girlie or two that would like a sundress...
there's a 'pinteresting' idea you might want to check out! 

Another idea which came from pinterest was...


Pack about 4-5 dozen wieners upright into a crock pot.
Do not add water.
Cover and cook for about 4 hours on low.

We tried it out at Lucy's big birthday party...
and it works like a charm!
The wieners are neither grilled nor boiled...
but taste rather like those that would come off a roller at a hot dog stand.

Two more down...and a long (and growing) list to go!
Feel free to check out my Pinterest boards right here.
You may even find a recipe or project to snag!

Friday, February 10, 2012

a message in a bottle...

Valentine's Day is just around the corner...
and here's gift idea for someone you care about!
It won't cost you much either...
mostly a little investment of time.
It is the 'gift of words'.
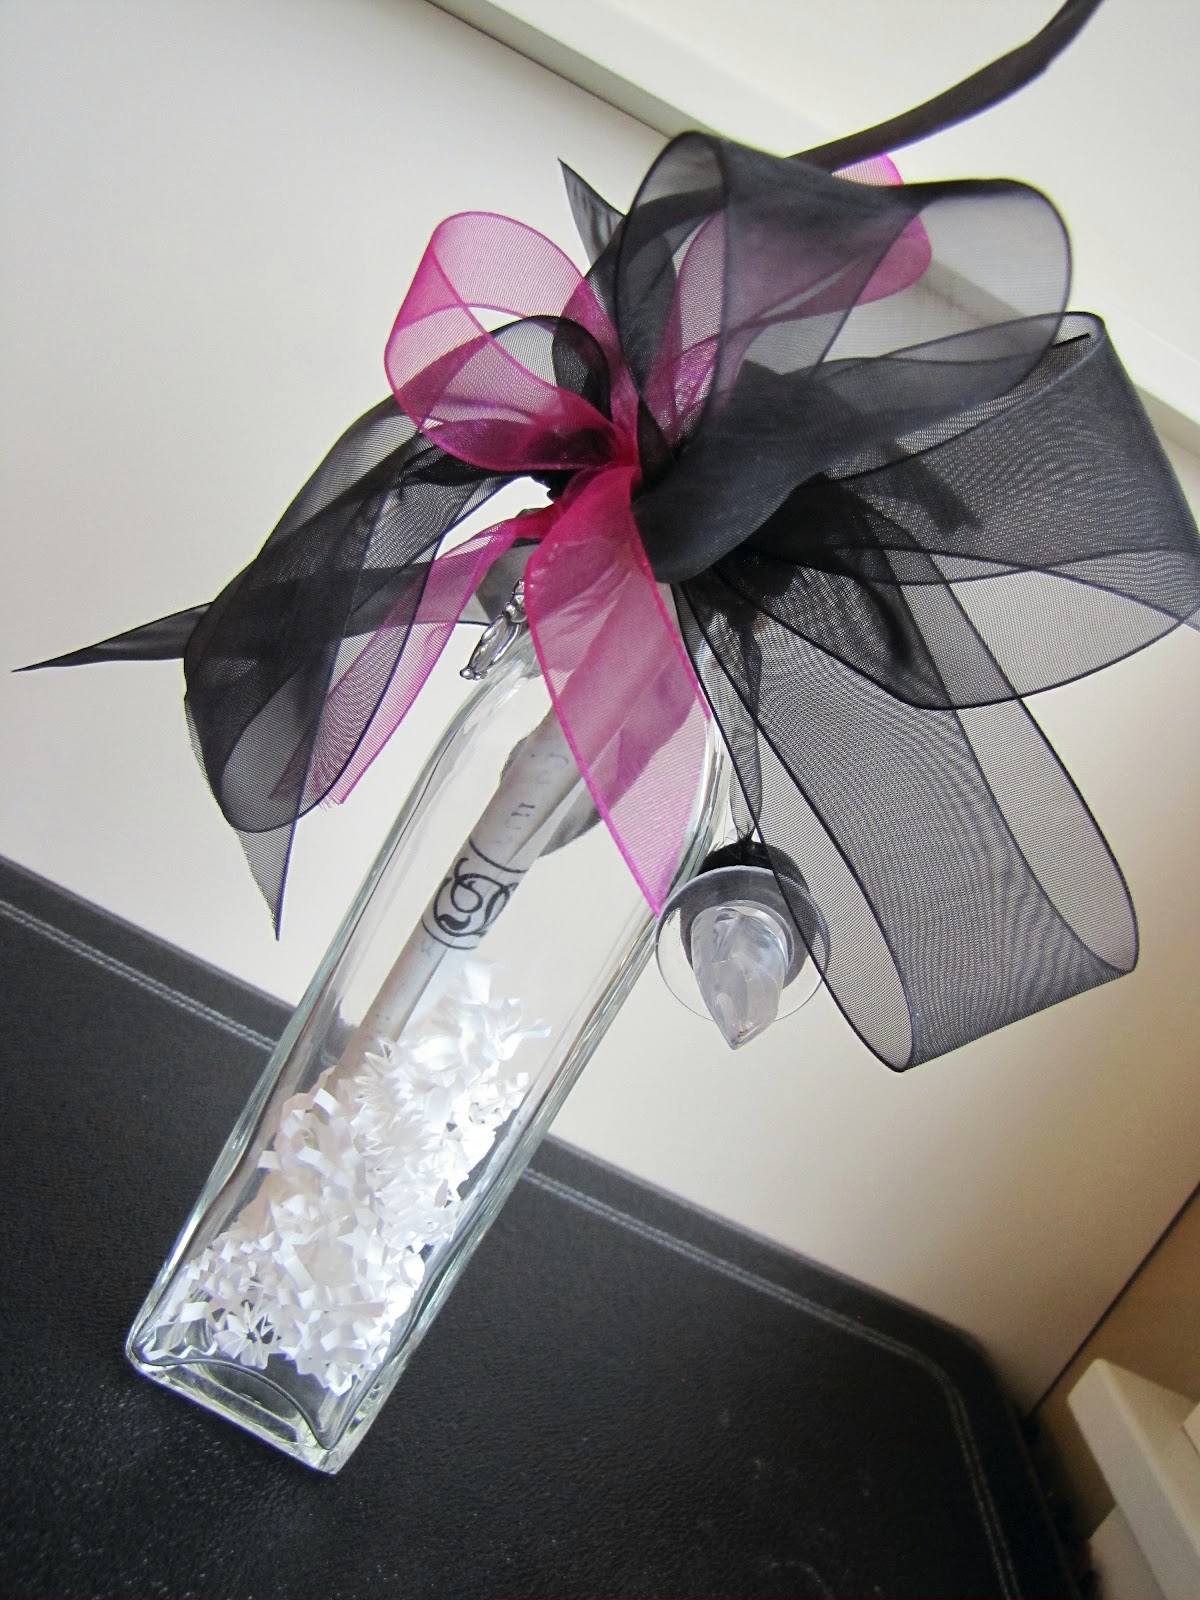
...a 'message in a bottle'.


I'm dropping one off on the doorstep of a friend today.
I wrote her a little note on parchment...
rolled it up tightly in an oil/vinegar bottle...
and tied on a bow for good measure.
The bow is recycled...
but she'll never know.
The words...
they are meant just for her.

Last summer we celebrated a milestone wedding anniversary.
I wanted to get hubby a special gift for the occasion...
but really could not think of anything.
I don't recall where I got the notion to give him a 'message in a bottle'...


...but it turned out to be a good notion!

I wrote a letter to him...
and told him what he meant to me.
Things I rarely say...
but should be said! 
I rolled up the letter...
and packaged it up in a lovely bottle.
That gift means more to him than any watch or ring I could have purchased.

You still have a few days.
Write a letter to those you love!

Have a wonderful weekend...

Wednesday, February 8, 2012

mason jar party favours...

You have been asking.
Today I am telling.
Not that there is much to tell!


Cowgirl goblets...
they were called on pinterest.
I filed the idea...
thinking they might be the perfect thing as party favours for the birthday party we were throwing.
And they were!

Find yourself some mason jars...
some candlesticks in the height you want...
and some hardy glue.

I bought a dozen of the teeny mason jars at our local Sup*rstore...
a dozen short candlesticks at the dollar store...
and E6000 glue at Walmart.
Glue one jar on top of each candlestick.
Yield: one dozen 'cowgirl goblets'.
Cost: about $2.00 each.
Time: 5-10 minutes 


We put sixty jelly bellys in each jar...
(and we won't tell you what those cost!)
...and tied a photo tag on the stem .

The tags were simply made from wallet-sized photos...
printed on card stock.

On the back of each tag we wrote a message:
 Friends are like jelly beans...
good to the bottom of the jar.
Judy & Marg


At each place setting was a bottle of sparkling juice...
appropriately dressed in an apron...
and a cowgirl goblet to go with it.

My friend Karen over at Ocean Soul...
did a lot of experimenting with this idea before I tried my hand at it...
and recommended the Cadillac of glues.

So that is your very easy tutorial for today!
Have fun with it.

Friday, February 3, 2012

the vintage fork easel...

As promised...
today is all about bending a fork out of shape...
just for fun!

I saw this idea on pinterest a few months ago...
and immediately went on a hunt for old silver forks.


Old silver forks make fantastic easels...
to display a wee photo or a vintage card.
The card pictured above is one my dad gave my mom...
some sixty-five years ago.

The forks can be found at thrift stores...
sometimes for ten cents each.
Other times...
more.

I had only a photo to go by...
so my easels are 'by guess and by golly'.


Since my forks were quite curved...
I started by flattening them a little on the workbench.
Using hubby's vice...
I secured the fork tightly and then proceeded to bend the tines with a plier.
Both outside tines were bent forward and a wee bit out at the base.
The two center tines were bent to the back...
and also out at an angle.


I used needlenose pliers to flip up the bottoms of the tines.

Nothing fancy...
but it worked.

The silver is quite soft and easy to mark with the pliers..
Use masking tape on tines to prevent that...
or not.

Once the easel is done...
check to see that it is sitting level.

If not...
it may need a wee bit adjusting.

I have given these away as gifts...
have a few sitting around my place...


...and we used some on our birthday party table earlier this week.

Next week I'll share a few of the other pinterest inspired things I have made recently.

So there you have it...
a five or ten minute project that makes a great gift!

Wednesday, November 23, 2011

on-the-road crocheting...

Baby Lucy came to spend the afternoon with Grammy yesterday...


 ...and was quite willing to model the hat I crocheted for her on our recent road trip to California.
Perfect!

Not everything from my crochet-as-we-drive bag turned out quite so good.
 The slippers I attempted may be functional...
but not so pretty!
I've commissioned slipper-making to my sister-in-law.
It's probably better that way.


It is hard to go wrong with dishcloths!
I have enough to last a long while.

Listening to an audio book...
poking through yarn with a hook...
and enjoying the sights along the way.
That's my favorite kind of road trip...
a good way to while away the miles.

Have a wonderful Wednesday!

To those who are interested in the 'ruffled rose hat' pattern...
it is available here. 

Thursday, October 13, 2011

the diaper cake recipe...

It's been months since I made it...the cake for Lucy's baby shower.  Buying the supplies was easy...putting it all together was fun...but finding instructions was the hardest part.  So I'll do my best to pass along the recipe as best I recall...for those of you who asked.


Ingredients:
  • 100 brand name disposable diapers...more or less.
  • scrap ribbon to tie each tier
  • 2" wide decorative ribbon to wrap the tiers
  • narrower co-ordinating ribbon to top wide ribbon
  • glue gun
  • cake topper (teddy bear)
  • co-ordinating goodies to attach to cake
  • round pizza pan
  • soup can or pop bottle...or anything round 
  • doweling
  • stick pins (use to secure ribbon while gluing)
For three tiers, use the following proportions: Tier 1 - 48 diapers / Tier 2 - 32 diapers / Tier 3-20 diapers.  Each tier should be about 1/3 smaller than the one beneath it.

 Method:
  1. Place a round bottle or can in the middle of a pizza pan.
  2. Working with forty diapers, begin by laying the first few on end and fanning them around the bottle.  Continue working, adding more and more diapers in pinwheel fashion around the centre, until 36 are used.
  3. Tie tightly around the middle with a length of scrap ribbon.
  4. Remove bottle from the middle, and stuff with remaining four diapers.
  5. Repeat for the second tier, using 28 diapers, and four in the centre.
  6. Repeat with third tier, using 16 diapers, and four for the centre.
  7. With scrap ribbon securing the tiers, go back and straighten out diapers to ensure even spacing.
  8. Measure out lengths of  decorator ribbon, allowing two inches overlap for each tier.
  9. Cut the ribbon, wrap around tier (over scrap ribbon) securing with stick pins.
  10. Glue the ribbon TO ribbon (not to diapers).
  11. Once glue has hardened and cooled, remove stick pins.
  12. Untie and pull out the scrap ribbon.
  13. To add a second layer of narrower ribbon, glue directly onto wide ribbon.
  14. Assemble the layers. 
  15. Put a doweling  (cut to length) through centre to hold tiers together.
  16. Now the fun part...decorate as you choose!  (Use floral picks or double-sided tape to secure decor items.)

I used flowers made from baby socks...washcloths rolled up...baby spoons and pacifiers...and topped the cake with a knit Teddy.  Place cake on a large round cake tray...and 'serve it up'.

Thursday, September 29, 2011

just a little something....

I have made some wonderful friends through blogging these past few years.
And I have learned so much from them!

I'm not always so good at coming up with ideas on my own...
but my bloggy friends are quite willing to share.
 And I am a good copykat!

I have picked up many ideas from my friend Judy on her blog...
Who would have thought of using antique crystal salt and pepper shakers as mini vases?
And who would have known that the can be purchased for 'peanuts' at the thrift shop?


Judy shared her inspiration a few years ago...
and I began my mini-vase collection soon after.
They make great vases next to the bathroom sink...
or to house a wee rosebud as a gift!

Perfect for fall...
an orange mum or two and a sprig of parsley.

Another idea I borrowed from Judy...
was that of writing messages on a plate.
Choose the plate of your choice...
write a message with a whiteboard marker...
and display on a picture stand.
Change the message to suit the day!


 The message on the plate is for my sweet grandgirlie who turns three today.
She won't be seeing it though...
since she is far away floating down the lazy river in the sunshine with her mommy and daddy.
We'll be celebrating with her next week!

And here's a little something that I saw in a florist display case once...
and thought it was a fun idea I could copy quite easily.


Use an ice-cream soda fountain glass as a vase...
fill with flowers of your choice...
and add two drinking straws to the arrangement.

The soda fountain vases can be found at the thrift store as well...
right near the salt and pepper shaker vases...
and for next-to-nothing!

And those are my 'little somethings' for today!


Wednesday, August 17, 2011

ice-bowls ~ nice bowls...

It all started a few months back...while I was on the treadmill.
I flipped through channels until I found one that caught my attention...
an ice-bowl tutorial.


And before I could forget...
I went out and picked my edible flowers and tried my hand at making an ice-bowl.


Here's how it is done.
Find two large bowls that nest nicely inside each other.
Scatter a good handful of blooms in the larger bowl...and then fill it part way with water.
Place the smaller bowl inside the larger one.
Fill the smaller bowl with ice-cubes to weigh it down...
and tape the bowls together to keep them in place.
Freeze the mold overnight.
Use a little warm water to un-mold the ice-bowl.
If you are not planning to use it immediately...
wrap tightly and freeze until the opportune moment arrives!

My bowl was made months ago...
and was almost forgotten in the freezer.

I have a good friend that I only see only very occasionally...
and I invited her for lunch the other day.


The 'almost forgotten' salad bowl came to mind...
and I fixed us a 'girlfriend salad' for lunch.
Mixed greens, chopped red onion, peach slices, fresh blueberries and caramelized pecans...
topped with poppy seed dressing.
And several hours later...the leftover salad was still crisp and cold...
while the bowl was only half the size!
(I should mention that the salad bowl needs to be placed on a 'saucer' that will catch the melting ice.)
And once again, Karen and I were caught up on the goings-on in our lives.

While I was in the ice-bowl-making-mode...
I tried the same method for making a bucket to keep the beverages cold.


I used lemons, limes and mint leaves.
Simple and fun...
you might want to try it!